Introduction
You’ve created your amazing iOS app and are ready to let the world use it.
If you want to share your app with millions of iPhone and iPad users around the world, it would have to be published by completing the Apple App Store submission process.
The App Store is a massive one, hosting around 2.095 million apps, of which 95.3% are free.
According to Statista, the mobile app market is expected to witness even higher growth in terms of profit in the year 2025, as 38,000 new apps are launched each year.
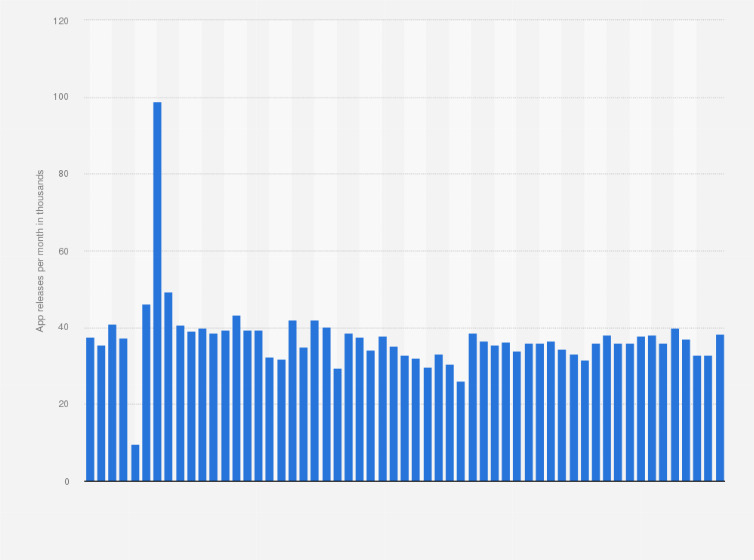
Therefore, now is an even greater time to partner with an iOS app development company or get your app published.
When you are new to the submission process, it might feel like walking on broken glass. Apple has its very own set of guidelines, multi-staged submission procedures, and additionally thorough quality checks that may end up in rejection if handled improperly.
But don’t worry—this guide will walk you through exactly how to publish an app to the App Store in 2025. We’ll cover:
- App Store submission requirements
- Step-by-step publishing process
- How to avoid common rejection reasons
- What to do after approval
By the end of this guide, you’ll have everything you need to successfully launch your app and start reaching users worldwide. Let’s get started!
Step-by-Step Guide on How to Publish an App to the App Store
It can be intimidating to publish an app on the Apple App Store, especially if you have never done it before.
All of the guidelines, technical requirements, and processes can leave you feeling utterly clueless.
However, we’re here to help you and make the entire process manageable by dividing it into 10 simple steps to publish iOS app without any hassle.
Step 1: Create your Apple Developer Account
Before you can publish an app to the App Store, you need an Apple Developer Account. An account allows you access to important developer resources, including App Store Connect, TestFlight, and Xcode.
How do you register?
- Go to developer.apple.com and log in with your Apple ID.
- Select “Account” → “Join the Apple Developer Program.
- Select the type of account you need (Individual or Company).
- Individual: They will ask for your personal details (name, email, legal contract).
- Company: An organization requires a D-U-N-S Number in order to verify identity.
- Pay the $99 registration fee (be advised that processing could take up to 48 hours).
Once you have approval, you can start the process of submitting apps to the App Store!
Read Also: The Complete App Development Guide: From Idea to Launch
Step 2: Install Xcode and Set Up Your Project
Xcode is Apple’s official development tool that allows you to build, test, and submit iOS apps. You will also use Xcode to manage your certificates and provisioning profiles.
How to Set Up Xcode:
- Download Xcode from the Mac App Store (requires macOS).
- Sign in with your Apple Developer account.
- Create a new project (or open an existing one).
- Set your Bundle ID (e.g., com.yourcompany.yourapp).
- This must match your App Store Connect entry later.
- Ensure your app is properly configured before moving to the next steps.
Pro Tip: Keep Xcode updated to avoid submission errors.
Step 3: Create an App Listing in App Store Connect
App Store Connect is your command center for managing everything about your app on the App Store. Here’s where you’ll set up:
- App details & metadata
- Screenshots & previews
- Pricing & availability
- Compliance information
How to Create Your App Listing:
- Go to App Store Connect and log in
- Click “My Apps” → “+” → “New App”
- Fill in critical details:
- App Name (exactly as users will see it)
- Primary Language (default display language)
- Bundle ID (must match your Xcode project)
- SKU (unique internal tracking code)
- User Access (assign team permissions)
- Click “Create” to finalize your listing
Pro Tip: Double-check your Bundle ID – mismatches cause immediate rejection!
Step 4: Configure Your App’s Metadata & Assets
First impressions matter! This step determines how users discover and perceive your app.
Must-Have App Store Assets:
| Asset Type | Requirements |
| App Icon | 1024×1024px PNG (no transparency) |
| Screenshots | 6.5″ Display: 1284×2778px (portrait/landscape) |
| App Preview | 15-30 sec video demo (optional but powerful) |
| Description | Compelling copy (max 4,000 chars) |
| Keywords | 100 chars total (separated by commas) |
| Support URL | Live customer help page |
Boost conversions: Use annotated screenshots showing key features in action!
Step 5: Set Pricing & Availability
Control where and how your app is sold worldwide:
Key Decisions:
- Free or Paid?
- Free: No cost to users
- Paid: Set base price (Apple takes 15-30% commission)
- Availability:
- Select specific countries/regions
- Schedule release dates (e.g., global launch at a set time)
- Content Rating:
- Complete Apple’s questionnaire to get age ratings
Smart Strategy: Consider starting free with in-app purchases – 98% of App Store revenue comes from IAPs!
Step 6: Prepare Your App for Submission
Before you can publish an iOS app, you need to ensure it’s properly signed and ready for upload.
How to Prepare in Xcode:
- Open Xcode → Preferences → Accounts
- Sign in with your Apple Developer account
- Go to your project’s Signing & Capabilities tab
- Enable “Automatically manage signing.”
- Xcode will generate development/distribution certificates
- Creates necessary provisioning profiles
Critical Check:
- Verify that the Bundle Identifier matches App Store Connect.
- Ensure version/build numbers are updated.
Step 7: Upload Your App Build to App Store Connect
Time to send your app to Apple!
Upload Process:
- In Xcode: Product → Archive (wait for indexing)
- In the Organizer window:
- Select your app → Distribute App
- Choose “App Store Connect.”
- Select “Upload” (not export)
- Wait for upload completion (5-20 mins, depending on app size)
Watch for:
- “Invalid Binary” emails (means upload failed)
- Missing compliance info (like encryption exports)
(Large app? Consider using App Store Connect API for faster uploads.)
Step 8: Submit for Apple’s Review
The make-or-break phase!
Submission Checklist:
- In App Store Connect:
- Go to App Store tab → “Submit for Review”
- Answer export compliance questions:
- Does your app use encryption? (Most select “No”)
- Provide a demo account if a login is required
- Confirm content rights (you own all assets)
Review Times:
- Standard: 24-48 hours
- Extended: 3-5 days (common for new developers)
Pro Tip: Submit early in the week – Apple reviews slow down on Fridays!
Step 9: Pass Apple’s App Review
Apple rejects ~40% of apps initially. Avoid common pitfalls:
Top Rejection Reasons & Fixes:
| Issue | Solution |
| Crashes/Bugs | Test on 10+ devices using TestFlight |
| Poor UI | Follow iOS Human Interface Guidelines |
| Data Collection | Add detailed privacy nutrition labels |
| Broken Links | Verify all support/privacy URLs work |
If Rejected:
- Apple provides specific resolution steps
- Make changes → Resubmit (avg. 2-3 day re-review)
Step 10: Launch & Promote Your App!
Your app is approved! Now maximize visibility:
Launch Day Checklist:
- In App Store Connect: “Release This Version“
- Apps go live within 1-3 hours (usually)
- Marketing Essentials:
- Run App Store Search Ads (70% install boost)
- Pitch to tech blogs (Example email templates [here])
- Share promo codes with influencers
- Post-Launch Optimization:
- Analyze App Analytics for retention drops
- A/B test screenshots every 2 weeks
- Reply to all reviews (improves ranking)
Sustained Growth Tip: Plan monthly updates – apps updating 4x/year get 2.3x more downloads!
Apple’s App Store Review Guidelines
Apple has official guidelines which provide policies regarding the content of submitted apps to the App Store. This guarantees a safe and trustworthy experience for users. The guidelines defend against security threats, protect Apple’s brand reputation, and encourage fair competition.
If you want to know how to publish an app to the App Store without rejections, follow these critical guidelines. So let’s look at the areas you need to focus on during the 2025 App Store submission process:
- Safety & Privacy Compliance
Data Collection Transparency
- Provide a clear privacy policy that explains what user data you collect.
- Disclose all data tracking in App Store Connect for transparency.
- Follow App Tracking Transparency (ATT) rules and get user consent before tracking.
No Harmful Content
- No malware, phishing, or deceptive behavior that could harm users.
- Bans on hate speech, violence, or illegal content that violates Apple’s policies.
Pro Tip: Apps that violate privacy rules face instant rejection during app store submission, so double-check your compliance.
- Performance & Stability
No Crashes or Bugs
- Test thoroughly on multiple iOS devices to ensure smooth performance.
- Fix all crashes before uploading to the App Store to avoid rejection.
Minimum Functionality
- Apple rejects “placeholder” apps that don’t offer real functionality.
- Your app must provide real value and work as described in the listing.
Pro Tip: Use TestFlight beta testing to catch issues before deploying to the App Store, ensuring a stable release.
- Business & Monetization Rules
In-App Purchases (IAP)
- Apple takes a 15-30% commission on digital purchases made within the app.
- Physical goods/services can use third-party payments without Apple’s cut.
No Misleading Pricing
- Free apps cannot suddenly charge users without clear disclosure.
- Subscription terms must be clearly displayed to avoid user complaints.
Tip: If you publish an iOS app with hidden fees, expect rejection, so be transparent about costs.
- Design & User Experience (UX)
Follow Apple’s Human Interface Guidelines (HIG)
- Use native iOS UI elements for a familiar user experience.
- Ensure smooth navigation and intuitive interactions throughout the app.
Avoid Placeholder Content
- No “lorem ipsum” or broken links that indicate incomplete development.
- All features must work as described in the app store listing.
Pro Tip: A polished UI improves chances of publishing an app on the App Store successfully, so invest in good design.
- Intellectual Property (IP) & Legal
No Copyright Violations
- Only use original or licensed assets to avoid legal issues.
- Avoid trademarked names (e.g., “iChat”) that could confuse users.
No Spam or Clones
- Apple bans copycat apps that duplicate existing functionality.
- Duplicate apps must offer unique value to be approved.
Tip: Before you submit to the App Store, verify all content is legally yours to prevent takedowns.
What Happens If Your App Gets Rejected?
Apple will email detailed rejection reasons explaining what needs fixing. Common fixes include:
- Adjust privacy settings to comply with data collection rules.
- Fix crashes and bugs reported during testing.
- Update app metadata if descriptions or screenshots violate guidelines.
- You can resubmit after corrections—average review time is 24-48 hours for reevaluation.
Final Checklist Before Submission
✔️ Tested on iOS 17+ to ensure compatibility.
✔️ Added privacy details in App Store Connect for transparency.
✔️ Verified no copyrighted material to avoid legal issues.
✔️ Followed Apple’s HIG for a seamless user experience.
Read Also: 30 Best Offline iPhone Games (No Internet? No Problem!)
Why Apps Get Rejected & How to Avoid It
Even experienced developers have faced rejection when publishing their app to the App Store due to failure to follow Apple’s rules. If you recognize these common rejections, that can help you successfully submit your app the first time you submit it to the App Store.
Here is a list of the most common types of reasons apps are rejected when submitting to the App Store, along with verified solutions to help you publish your iOS app without delay:
| Reason for Rejection | How to Avoid It |
| Bugs and Crashes | Thoroughly test on physical devices (not just simulators) and use TestFlight beta testing with real users before uploading to the App Store. |
| Incomplete App Metadata | Provide all required assets: high-quality screenshots (6.5″ display size), compelling description (under 4,000 chars), accurate age rating, and proper categorization before you submit an app to the App Store. |
| Privacy Policy Violations | Create a clear privacy policy page and fully disclose all data collection in App Store Connect to comply with Apple’s App Store submission requirements. |
| Misleading Content | Ensure your app’s functionality matches its description exactly. Don’t exaggerate features or include placeholder content when you deploy to the App Store. |
| Wrong Payment Methods | Use Apple’s In-App Purchase system exclusively for digital goods. Only physical products/services can use alternative payment systems when you publish on the App Store. |
| Poor UI/UX Design | Follow Apple’s Human Interface Guidelines (HIG) precisely. Use native iOS UI elements and ensure intuitive navigation before app store deployment. |
| Insufficient Content | Your app must provide substantial, unique functionality. Avoid “lite” versions or apps that simply repackage web content when trying to get your app in the App Store. |
| Provisioning Errors | Verify all certificates and profiles in Xcode. Use “Automatically manage signing” or manually validate your provisioning setup before App Store submission. |
| Metadata Mistakes | Triple-check your app name (no trademark violations), keywords (100-character limit), and support URL before final submission to the App Store. |
Read Also: 13 Costly App Development Mistakes You Must Avoid
Google Play vs. App Store: Which Platform is Better for Your App?
The choice between Google Play and the Apple App Store depends on what you want as a developer.
Google Play offers greater volume (3.5M+) and has a faster approval process. This makes Google Play a great choice for indie developers and of course free apps.
Apple has a better quality control process, but you know that leads to higher quality security and a premium user experience. Apple makes it harder to have your app approved.
If you want more downloads and flexibility, you want to publish to Google Play. If revenue, security, and high-quality users are more important, then the App Store is the way to go.
Each platform has its strengths, so choose the one that works with your app strategy!
- Google Play → More apps, easier approval → better for free apps
- App Store → Higher quality, stricter rules → better for paid/premium apps
Conclusion
The submission process in Apple’s App Store can seem intimidating. However, following these simple steps to figure out all of Apple’s requirements will help you know the process will go as fast as it can and smoothly. It takes time, but you will ultimately get your app submitted!
You can go from how to set up your Apple Developer Account and prepare for App Store review to publishing your app, where millions of users can download it from the App Store.
Remember:
- Follow Apple’s guidelines to avoid getting denied
- Test your app thoroughly before submitting
- Optimize your app metadata for visibility.
Now, you’ve learn how to publish an app to the App Store, it is time to take the next step! Get your app ready for submission and get ready to engage the users you’ve just drawn back the curtains for! 🚀
Have your concerns? Our experienced team primarily does submissions for the App Store and beyond. Reach out to us if you’d like to book a strategy meeting with our team!
FAQs
- What is the cost of publishing an app on the App Store?
To publish an app on the App Store, you will need a membership in the Apple Developer Program at an annual cost of $99. For Entrepreneurship, the cost is $299 a year under the Enterprise Program.
- How long will it take for an app to receive approval from Apple?
It takes approximately 24 to 48 hours of standard feedback from the App Store submission review, but especially in cases where your app did not pass some of the guidelines during the app store publishing submissions (which will make this process longer while you make changes based on Apple’s feedback).
- How to create the app on the App Store?
Enroll in the Developer Program to publish your applications on the App Store, then develop the application with Xcode. Test the iOS app on real devices and conduct beta testing through TestFlight before the final submission through App Store Connect.
- Is it free to develop as an Apple Developer?
No, you cannot get your app to the App Store without paying for an account. You have to pay $99 per year for an Apple Developer account to submit your app to the App Store.
- Can I publish an iOS app on my own?
Yes you can publish your own iOS app, but as long as you have access to a Mac, are familiar with Xcode, and are skilled in either Swift or Objective-C.


